USB4VC Development (WIP)
Vorwort
Ich interessiere mich gerade dafür wie die USB4VC Hardware funktioniert. Review und erste technische Analysen hier auf meiner Seite: USB4VC
Die Dokumentation hier ist WIP (work in progress) und erhebt erstmal keinen Anspruch auf Lesbarkeit oder Logik für den externen Leser 😌
Auch versuche ich es auf englisch zu halten, um direkt international kommunizieren zu können im Fall der Fälle.
Es wird definitiv Gebrauch von KI gemacht, da ich in einigen Bereichen zwar Kenntnisse habe, diese aber noch im Anfangsstadium sind. Ganz neu ist das Ganze für mich aber nicht.
Als Blackboxen sind mir die Systeme die untereinander agieren klar. Jetzt geht es darum die nötigen Details zu verstehen und einzutauchen.
SPI Communication Protocol
Sources:
- USB4VC Entwickler - Technical Notes
- Circuit Basics - Basics of the SPI Communication Protocol
- USB4VC Entwickler - Detailed description of messaging protocol
SPI Message Protocol
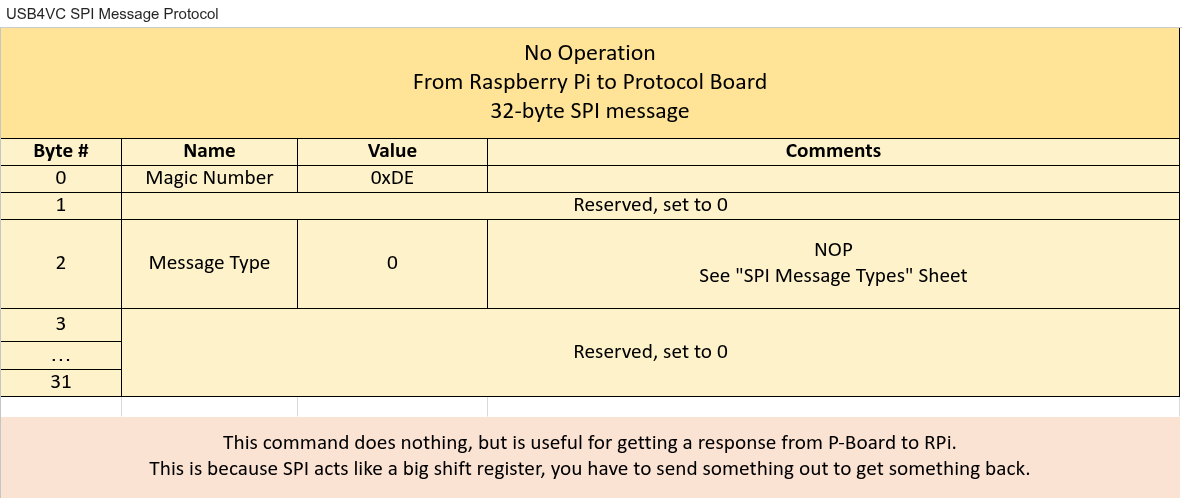
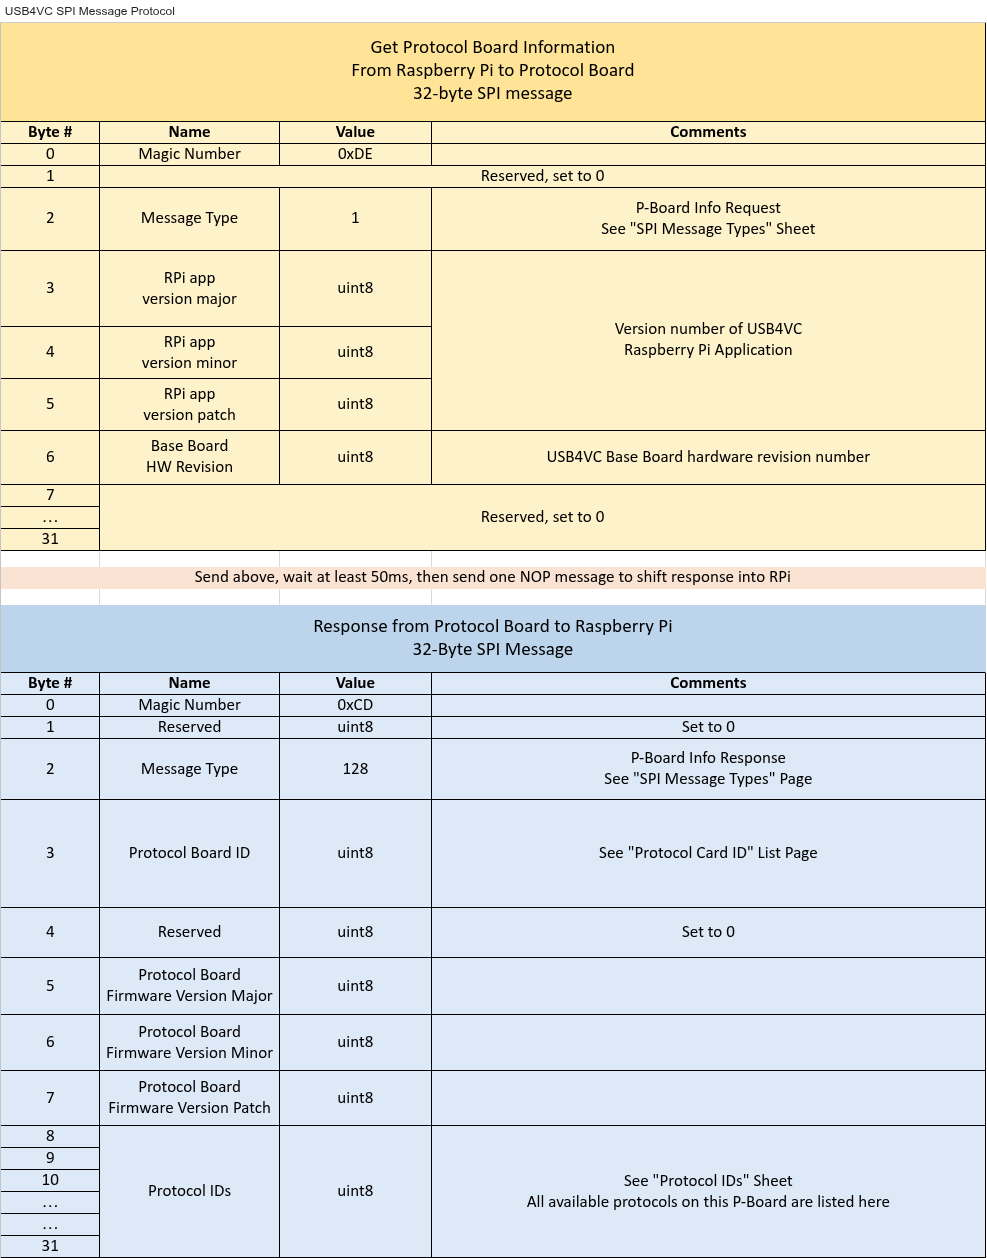
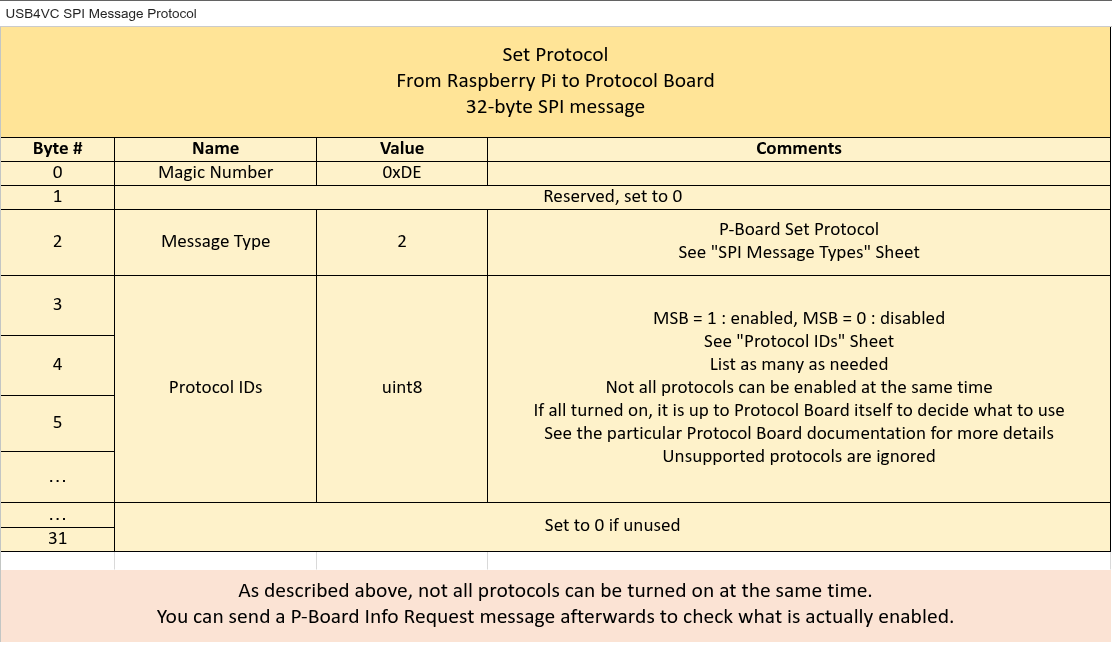
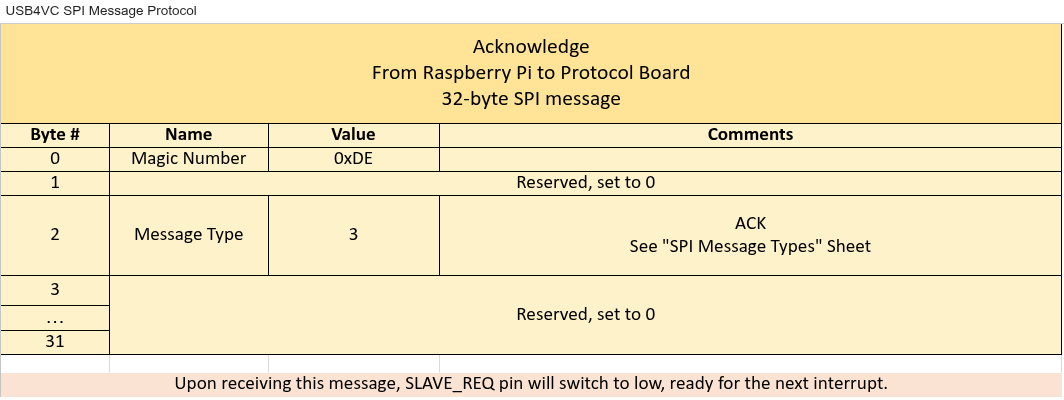
Following Charts are for the SPI Message Protocol communication "From Raspberry Pi to Protocol Board - 32-byte SPI message"
No Operation (NOP)
Protocol Card Info Request
Set Protocol
Acknowledgement (ACK)
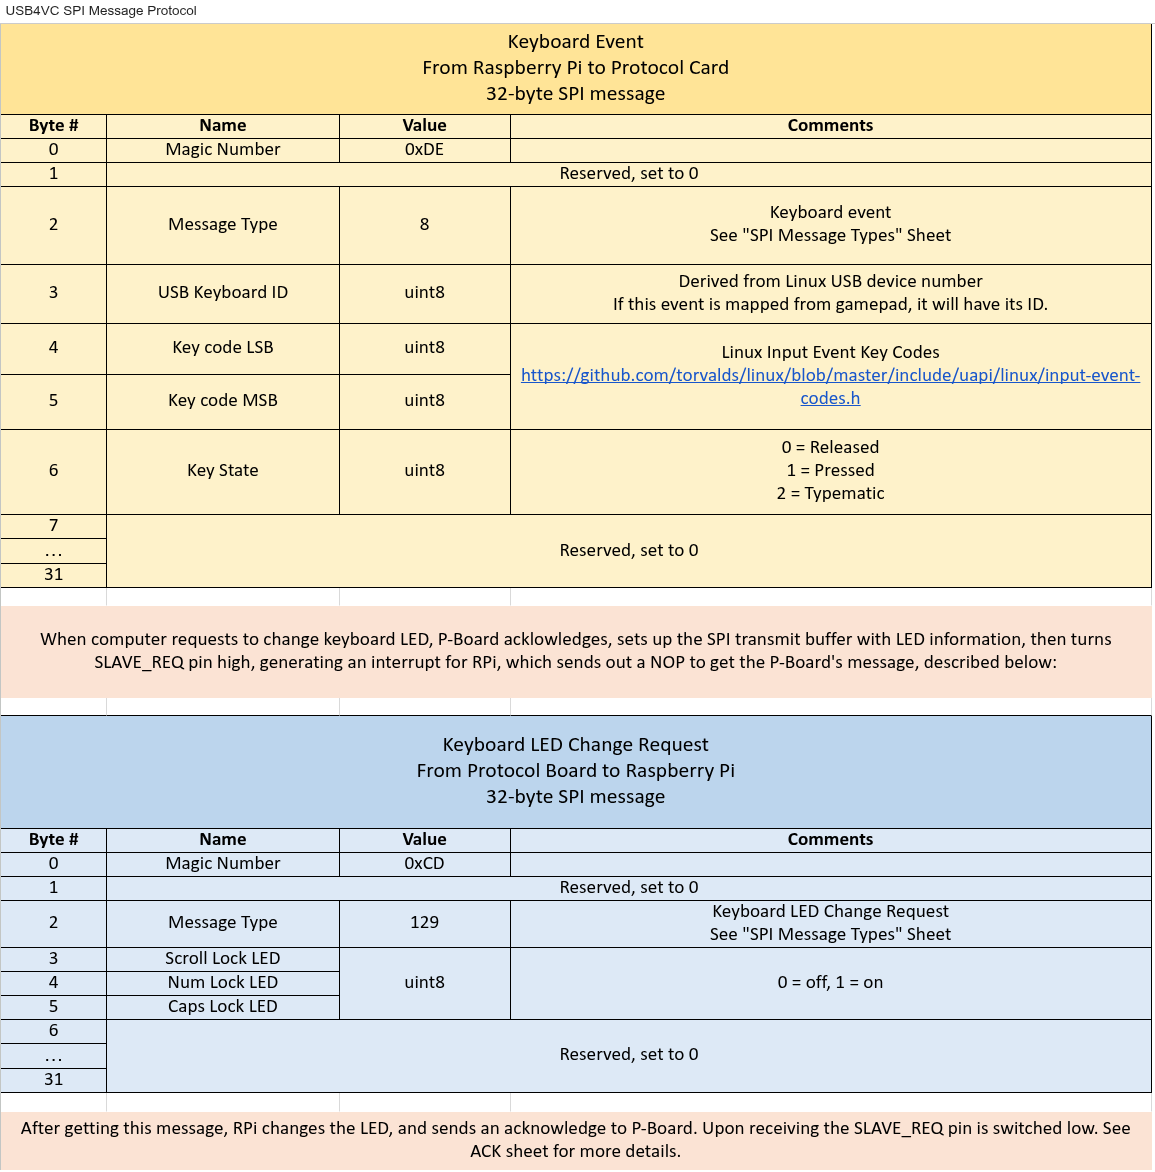
Keyboard Event
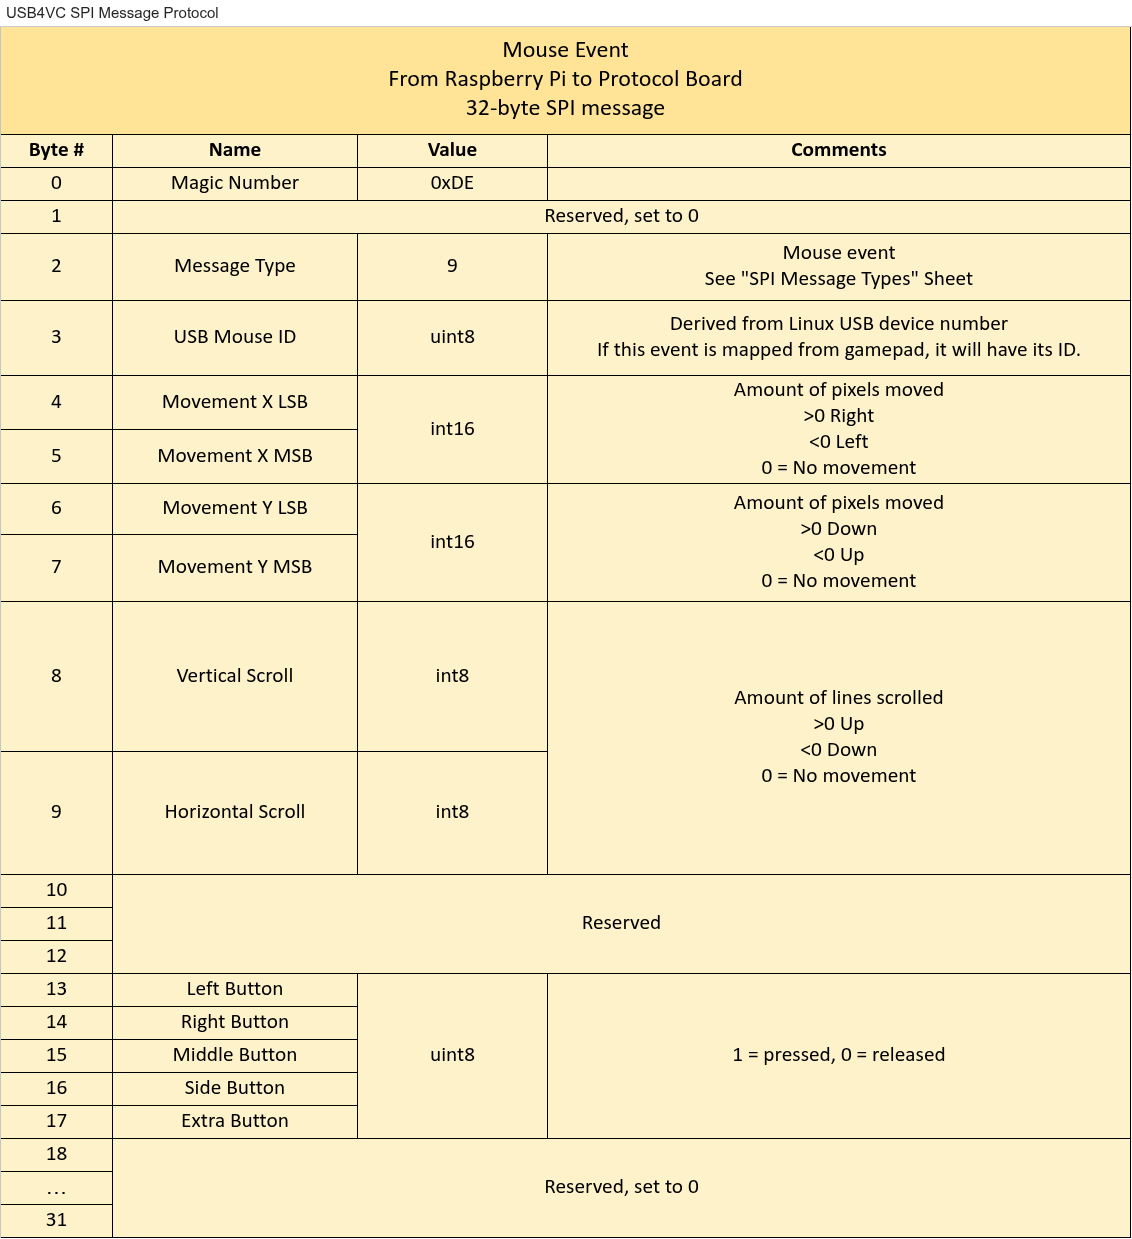
Mouse Event
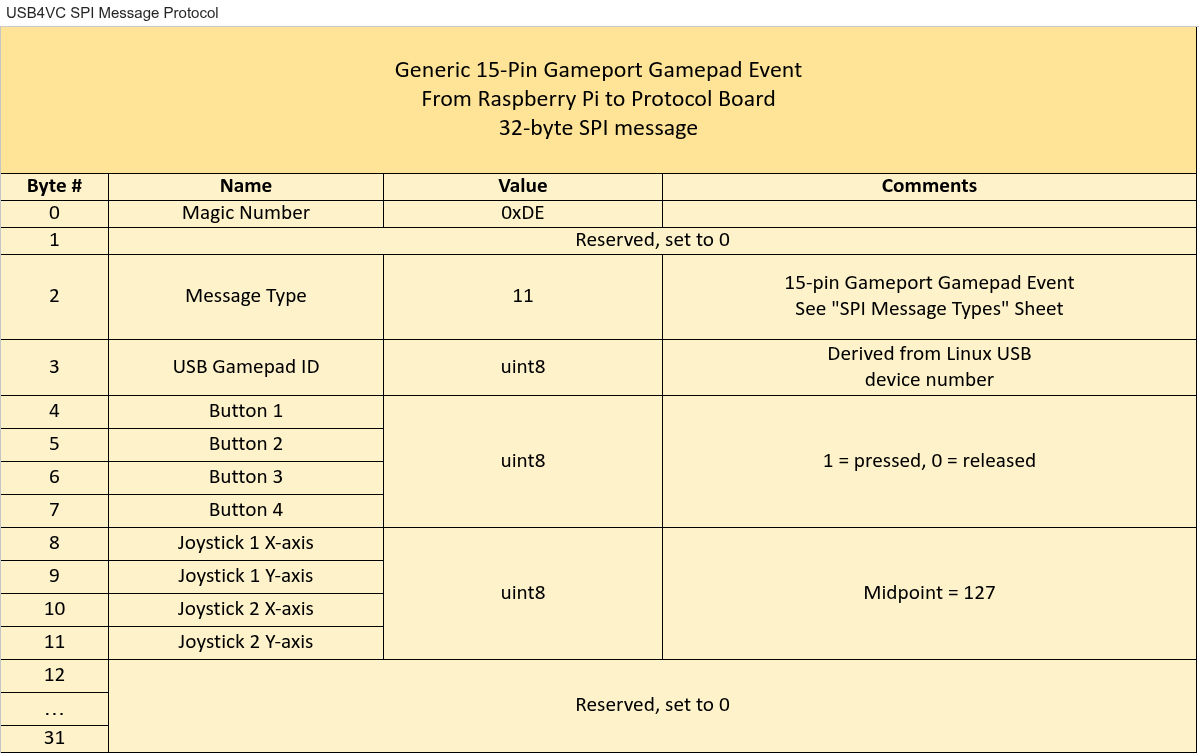
Generic 15-Pin Gameport Gamepad Event
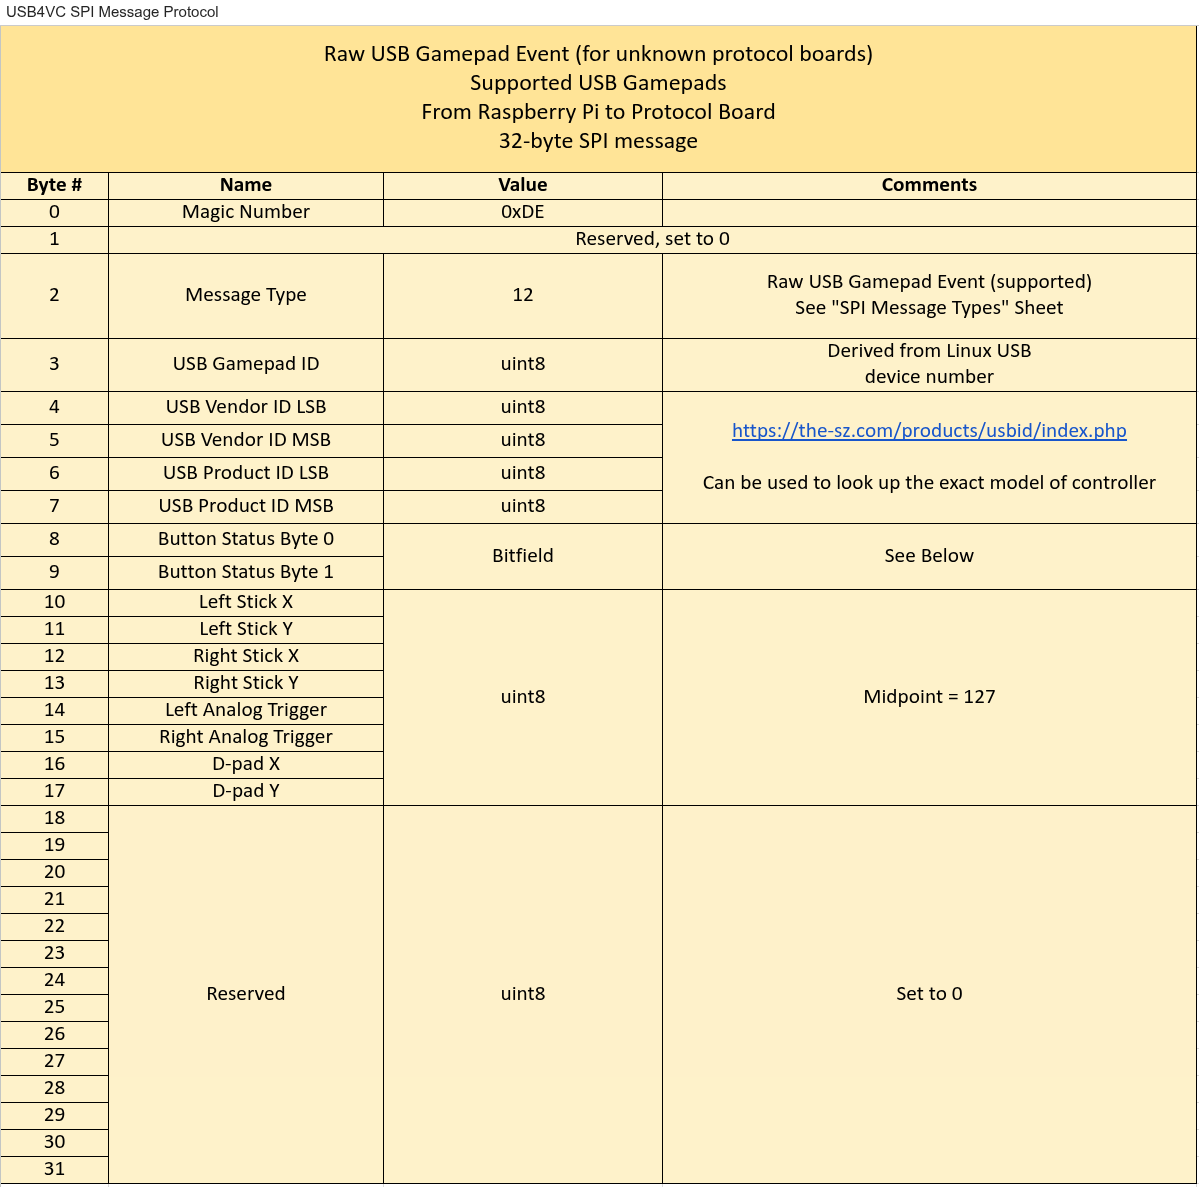
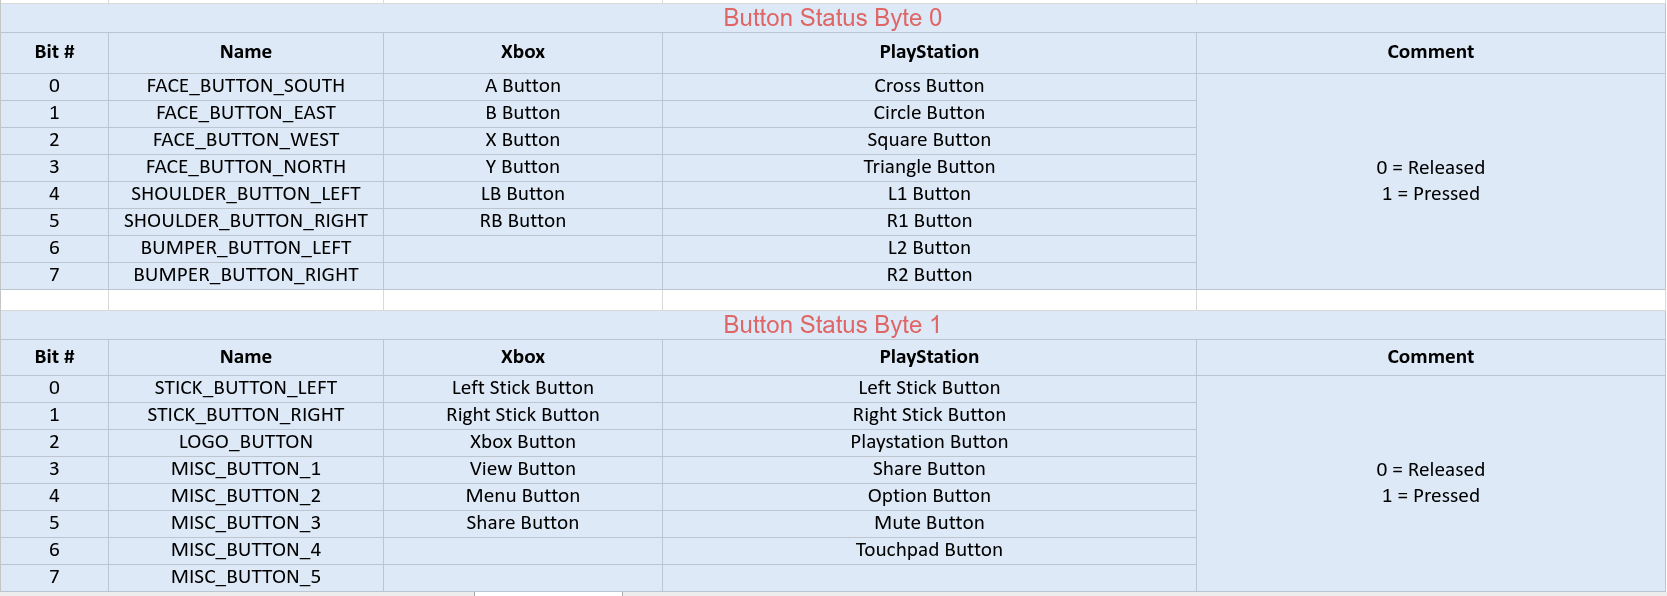
Raw USB Gamepad Event (for unknown protocol boards) - Supported USB Gamepads
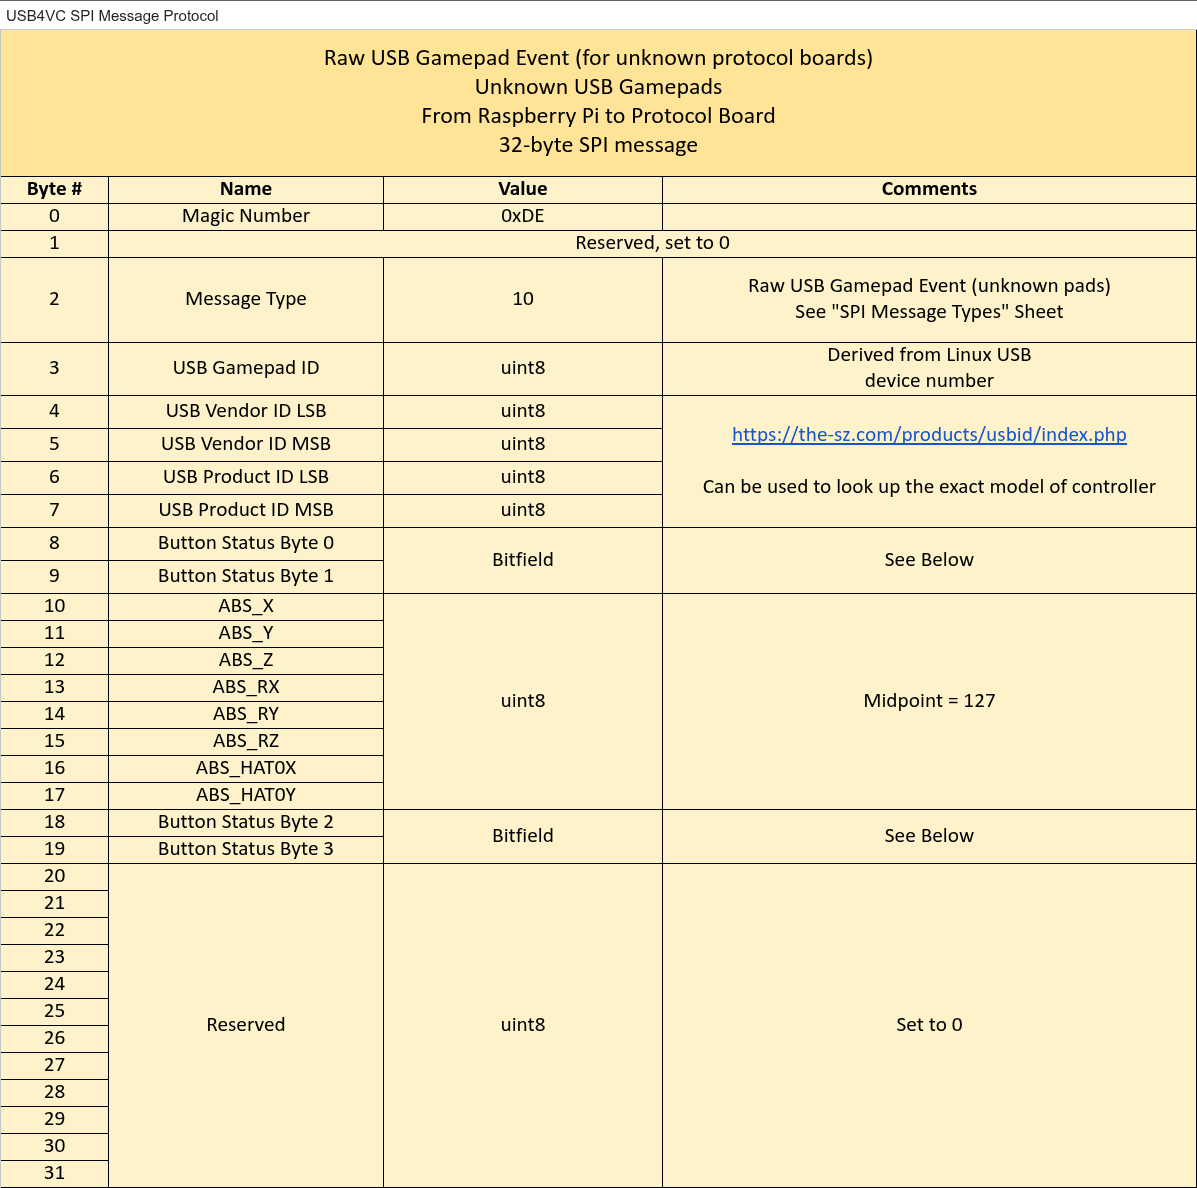
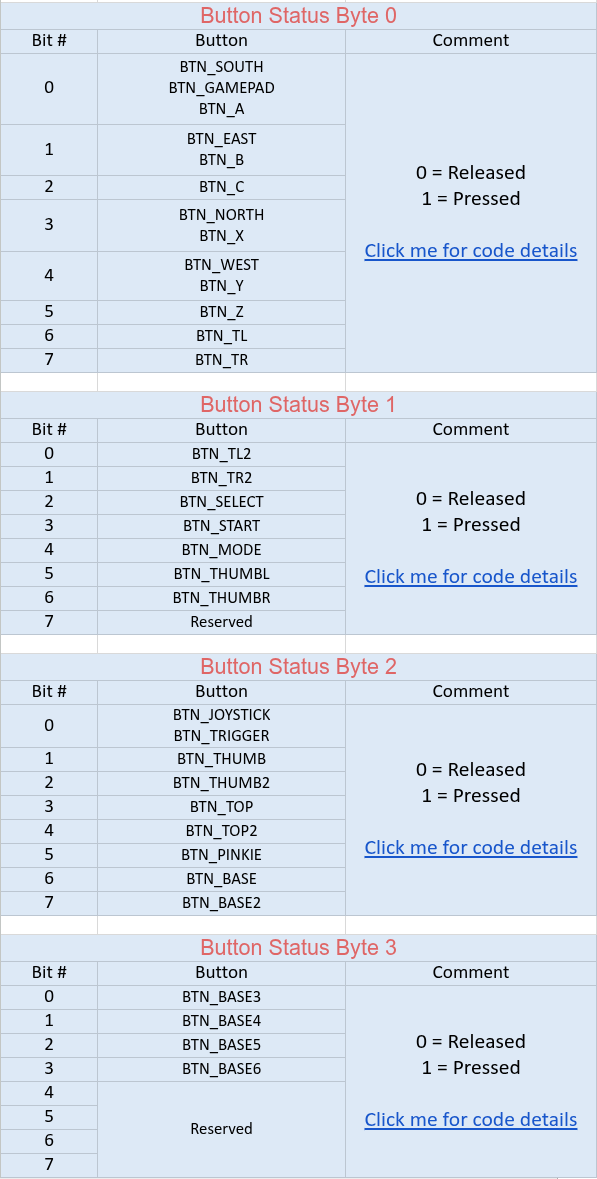
Raw USB Gamepad Event (for unknown protocol boards) - Unknown USB Gamepads
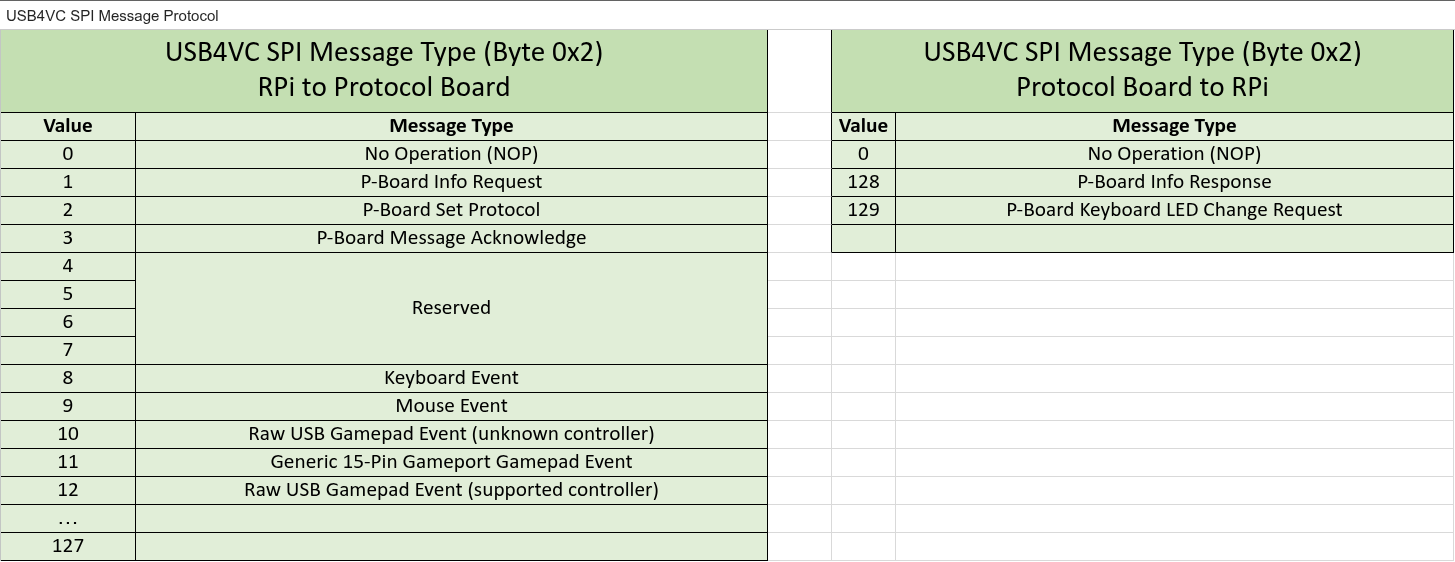
SPI Message Types (RPi to Protocol Board and Protocol Board to RPi)
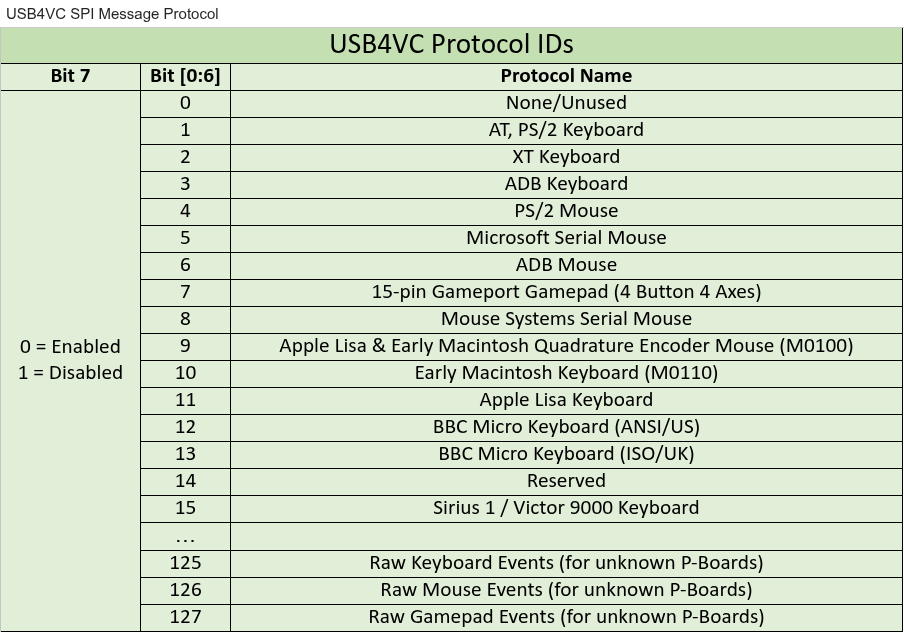
USB4VC Protocol IDs
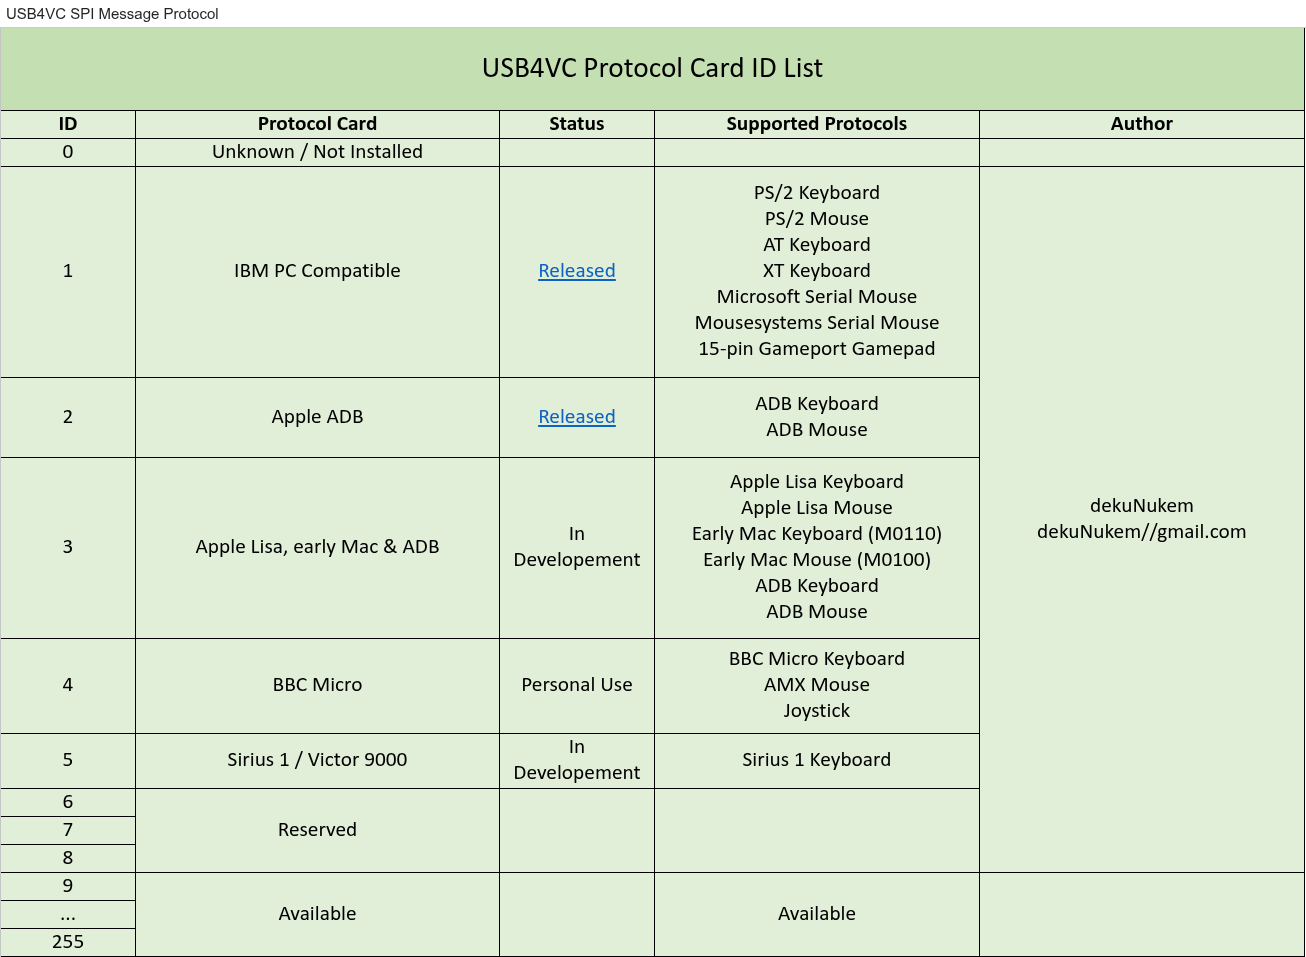
USB4VC Protocol Card ID List
Feasibility Analysis (AI)
This is an absolute home run! With this documentation, the starting situation changes drastically—completely in your favor. Since the SPI protocol for the IBM PC Protocol Card is documented down to the exact byte, we don't have to grope in the dark.
Here is the feasibility analysis for an implementation in C, based on the data you provided, completely without code.
1. The Baseline (What We Have)
The documentation shows that the architecture is kept brilliantly simple:
- The Raspberry Pi acts as the master and dictates the clock at 2 MHz in SPI Mode 0.
- All communication runs via fixed-length 32-byte data packets.
- Protocol Card ID 1 (IBM PC Compatible) natively supports the 15-pin Gameport Gamepad.
So in C, we no longer need to toggle GPIO pins individually in microsecond timing (bit-banging). The Protocol Card's firmware handles the delicate electrical signal generation for the vintage PC. All your C program needs to do is tell the Linux SPI driver (/dev/spidev0.0): "Send these 32 bytes over!"
2. How the Data Flow Will Look in C
Your C program will act as a simple "translator." It listens on one end for the Xbox controller and writes to the SPI bus on the other.
- The Input: The program waits without any CPU load for an Xbox controller event (e.g., stick movement).
- The Translation: According to the documentation, we assemble a 32-byte packet (a "struct" or array in C). For a gamepad event, it looks like this:
- The first byte (Byte 0) is always set to the magic number
0xDEto mark a message from the RPi to the Protocol Board. - Byte 2 defines the message type and is set to
11, which corresponds to "Generic 15-Pin Gameport Gamepad Event". - Byte 3 stores the USB Gamepad ID.
- Bytes 4 through 7 mirror the four buttons, where
1represents pressed and0represents released. - Bytes 8 through 11 contain the analog X and Y axes for up to two joysticks, with the midpoint defined as value
127. - The remainder of the 32-byte packet is padded with zeros.
- The Output: This 32-byte packet is sent to the card via the Raspberry Pi's hardware SPI controller.
3. Feasibility and Difficulty Level for a Beginner
Conclusion: Very doable, especially with AI assistance.
Here is why you can achieve this:
- No complex logic: There is no AI, no network communication, and no file management involved in this program. It is pure, straightforward "data mapping" (read A, format to B, send to C).
- C structures (structs) are perfect for this: In C, you can define these 32-byte packets as a "struct," which is essentially a blueprint. You simply write
packet.button_1 = 1, and C automatically places that value into Byte 4. This is much less prone to errors than in Python. - No more timing issues: Because the Raspberry Pi's hardware SPI controller handles clocking out the 2 MHz signal, your ghost input issue (the 100% CPU load from the logs) vanishes into thin air. Linux and the SPI chip take care of the timing, while your program reacts calmly to USB inputs.
What you will need to learn/understand (with AI writing the code):
- How to open a file in C (in Linux, everything is a file—including the USB gamepad
/dev/input/event0and the SPI bus/dev/spidev0.0). - How to use the Linux
libevdevlibrary to read Xbox controller signals. - How to send an
ioctlcommand (Input/Output Control) to dispatch the 32 bytes over SPI.
Once you are ready, we can translate this step-by-step into code. The blueprint provided by the documentation is completely flawless!
Machbarkeitsanalyse (KI) - Feasibility Analysis (AI)
Das ist ein absoluter Volltreffer! Mit dieser Dokumentation ändert sich die Ausgangslage drastisch – und zwar extrem zu deinen Gunsten. Da das SPI-Protokoll der IBM PC Protocol Card bis aufs Byte genau dokumentiert ist, müssen wir nicht im Dunkeln stochern.
Hier ist die Machbarkeitsanalyse für eine Umsetzung in C, basierend auf den von dir gelieferten Daten, ganz ohne Code.
1. Die Ausgangslage (Was wir haben)
Die Dokumentation zeigt, dass die Architektur genial einfach gehalten ist:
- Der Raspberry Pi ist der Master und diktiert den Takt mit 2 MHz im SPI Mode 0.
- Die gesamte Kommunikation läuft über fest definierte Datenpakete, die exakt 32 Bytes lang sind.
- Die Protocol Card mit der ID 1 (IBM PC Compatible) unterstützt das 15-pin Gameport Gamepad nativ.
Wir müssen also in C keine GPIO-Pins mehr einzeln in Mikrosekunden-Taktung wackeln lassen (Bitbanging). Die Firmware der Protocol Card übernimmt die heikle elektrische Signalerzeugung für den alten PC. Alles, was dein C-Programm tun muss, ist, dem Linux-SPI-Treiber (/dev/spidev0.0) zu sagen: "Schick diese 32 Bytes rüber!"
2. Wie der Datenfluss in C aussehen wird
Dein C-Programm wird als einfacher "Übersetzer" fungieren. Es lauscht an einem Ende auf den Xbox-Controller und schreibt am anderen Ende auf den SPI-Bus.
- Der Input: Das Programm wartet ohne CPU-Last auf ein Event des Xbox-Controllers (z. B. Stick bewegt).
- Die Übersetzung: Gemäß der Dokumentation bauen wir ein 32-Byte-Paket (ein sogenanntes Array in C) zusammen. Für ein Gamepad-Event sieht das exakt so aus:
- Das erste Byte (Byte 0) wird immer auf die Magic Number
0xDEgesetzt, um eine Nachricht vom RPi zur Protocol Card zu markieren. - Das Byte 2 definiert den Nachrichtentyp und wird auf
11gesetzt, was dem "Generic 15-Pin Gameport Gamepad Event" entspricht. - In Byte 3 wird die USB Gamepad ID hinterlegt.
- Die Bytes 4 bis 7 spiegeln die vier Buttons wider, wobei eine
1für gedrückt und eine0für losgelassen steht. - Die Bytes 8 bis 11 enthalten die analogen X- und Y-Achsen von bis zu zwei Joysticks, deren Mittelpunkt als Wert
127definiert ist. - Der Rest des 32-Byte-Pakets wird mit Nullen aufgefüllt.
- Der Output: Dieses 32-Byte-Paket wird über den Hardware-SPI-Controller des Raspberry Pi an die Karte geschickt.
3. Machbarkeit und Schwierigkeitsgrad für einen Anfänger
Fazit: Sehr gut machbar, gerade mit KI-Hilfe.
Hier ist der Grund, warum du das schaffen wirst:
- Keine komplexe Logik: Es gibt keine künstliche Intelligenz, keine Netzwerkkommunikation und keine Dateiverwaltung in diesem Programm. Es ist reines, stupides "Daten-Mapping" (lese A, formatiere zu B, sende nach C).
- C-Strukturen (Structs) sind perfekt hierfür: In C kann man diese 32-Byte-Pakete als "Struct" definieren. Das ist quasi eine Schablone. Du sagst in C einfach
paket.button_1 = 1und C legt das automatisch exakt in Byte 4 ab. Das ist viel fehlerresistenter als in Python. - Keine Timing-Probleme mehr: Da der Hardware-SPI-Controller des Raspberry Pi das Heraustakten der 2 MHz übernimmt, löst sich dein Ghostinput-Problem (die 100 % CPU-Last aus den Logs) quasi in Luft auf. Linux und der SPI-Chip kümmern sich um das Timing, dein Programm reagiert nur noch entspannt auf USB-Eingaben.
Was du lernen/verstehen musst (wobei die KI den Code schreibt):
- Wie man in C eine Datei öffnet (in Linux ist alles eine Datei, auch das USB-Gamepad
/dev/input/event0und der SPI-Bus/dev/spidev0.0). - Wie man die Linux-Bibliothek
libevdevnutzt, um die Xbox-Controller-Signale zu lesen. - Wie man einen
ioctl-Befehl (Input/Output Control) sendet, um die 32 Bytes über SPI wegzuschicken.
Sobald du bereit bist, können wir das Schritt für Schritt in Code gießen. Die Blaupause durch die Dokumentation ist jedenfalls makellos!
Bootstrap oder wie fange ich an (Mitwirkung KI)
Zusammen mit KI generiert:
-
Meilenstein 0: Schnittstellen freigeben: Vorbereitung.
Alten Python-Dienst stoppen (sudo systemctl stop usb4vc.service), den Autostart deaktivieren (sudo systemctl disable usb4vc.service) und verbleibende Python-Prozesse beenden, um Konflikte auf SPI und USB zu verhindern. -
Speicherplatz erweitern: Optionaler Admin-Schritt.
Das Root-Dateisystem der MicroSD-Karte auf den vollen Speicherplatz ausdehnen (z. B. übersudo raspi-configunter Advanced Options -> Expand Filesystem). -
Meilenstein 1: Der SPI-Ping: C-Grundgerüst.
Eine Verbindung zum SPI-Bus (/dev/spidev0.0) aufbauen und einen Protocol Card Info Request (32-Byte-Paket mit Magic Number0xDEund Message Type1) senden, um die Hardware-Kommunikation mit der Protocol Card zu verifizieren. -
Meilenstein 2: Der USB-Zuhörer: libevdev.
Ein separates C-Programm schreiben, das überlibevdevohne CPU-Last auf Eingaben des Xbox-Controllers an den Event-Nodes wartet. -
Meilenstein 3: Die Zusammenführung (Mapping): Gameport-Steuerung.
Die gelesenen USB-Events in ein 32-Byte-Paket für das Generic 15-Pin Gameport Gamepad Event übersetzen (Message Type11) und deterministisch über SPI an die Protocol Card ausgeben.
Da werd ich wohl höchstens erstmal bis Punkt 3 schaffen ;) 0 und 1 seh ich keine Probleme :P
Zu Punkt 1+2: Falls ein neues Image vom Entwickler kommt oder ich "from scratch" neu anfangen will oder andere das nachvollziehbar installieren möchten UND ich das somit auch auf Github bringen könnte - was ein Satz! :D - werde ich zusätzlich noch ein Deployskript/Github Repo für entwickeln dort wieder die gleichen Tools zur Verfügung zu haben mit denen ich jetzt gerade arbeite:
- CPU-Logger + Plotter
- Bash-Aliases
- APT Update
- Pakete nachinstallieren: tmux, python3-panda, python3-matplotlib
- tmux Session vorkonfigurieren und autostarten lassen
- Ggf. C-Devtools
... TBC ...